If your home server or NAS uses ZFS, sanoid can take snapshots automatically and syncoid can copy them to another pool or machine. Set the retention rules in /etc/sanoid/sanoid.conf, then let sanoid create and prune snapshots on its timer. A second pool helps with disk failure; a copy on another machine also protects you if the original server fails.
Scrubs are the third piece. A scrub checks allocated data against its checksums and can repair damaged blocks when the pool has a good replica, such as a mirror or RAID-Z copy. Debian, Ubuntu and Proxmox VE already schedule one a month, and TrueNAS creates a scrub task for every new pool, so for most people the job is to confirm the schedule exists and learn to read zpool status.
Snapshots, replication and scrubs: what each one protects
These three features get lumped together as “ZFS backup”, but they solve different problems.
| Feature | Tool | Protects against | Does not protect against |
|---|---|---|---|
| Snapshots | sanoid (or zfs snapshot) | Deleted or overwritten files, bad updates, ransomware that encrypts shared folders, provided the attacker cannot delete the snapshots | Losing the pool or the whole machine |
| Replication | syncoid (zfs send and receive) | A dead pool, a dead server, and with an off-site target, fire or theft | Corruption you replicate before noticing, unless older snapshots are kept |
| Scrubs | zpool scrub on a schedule | Silent bit rot on a disk, found and repaired from redundancy | Deleted files, failed pools, anything without a good second copy |
How ZFS snapshots work
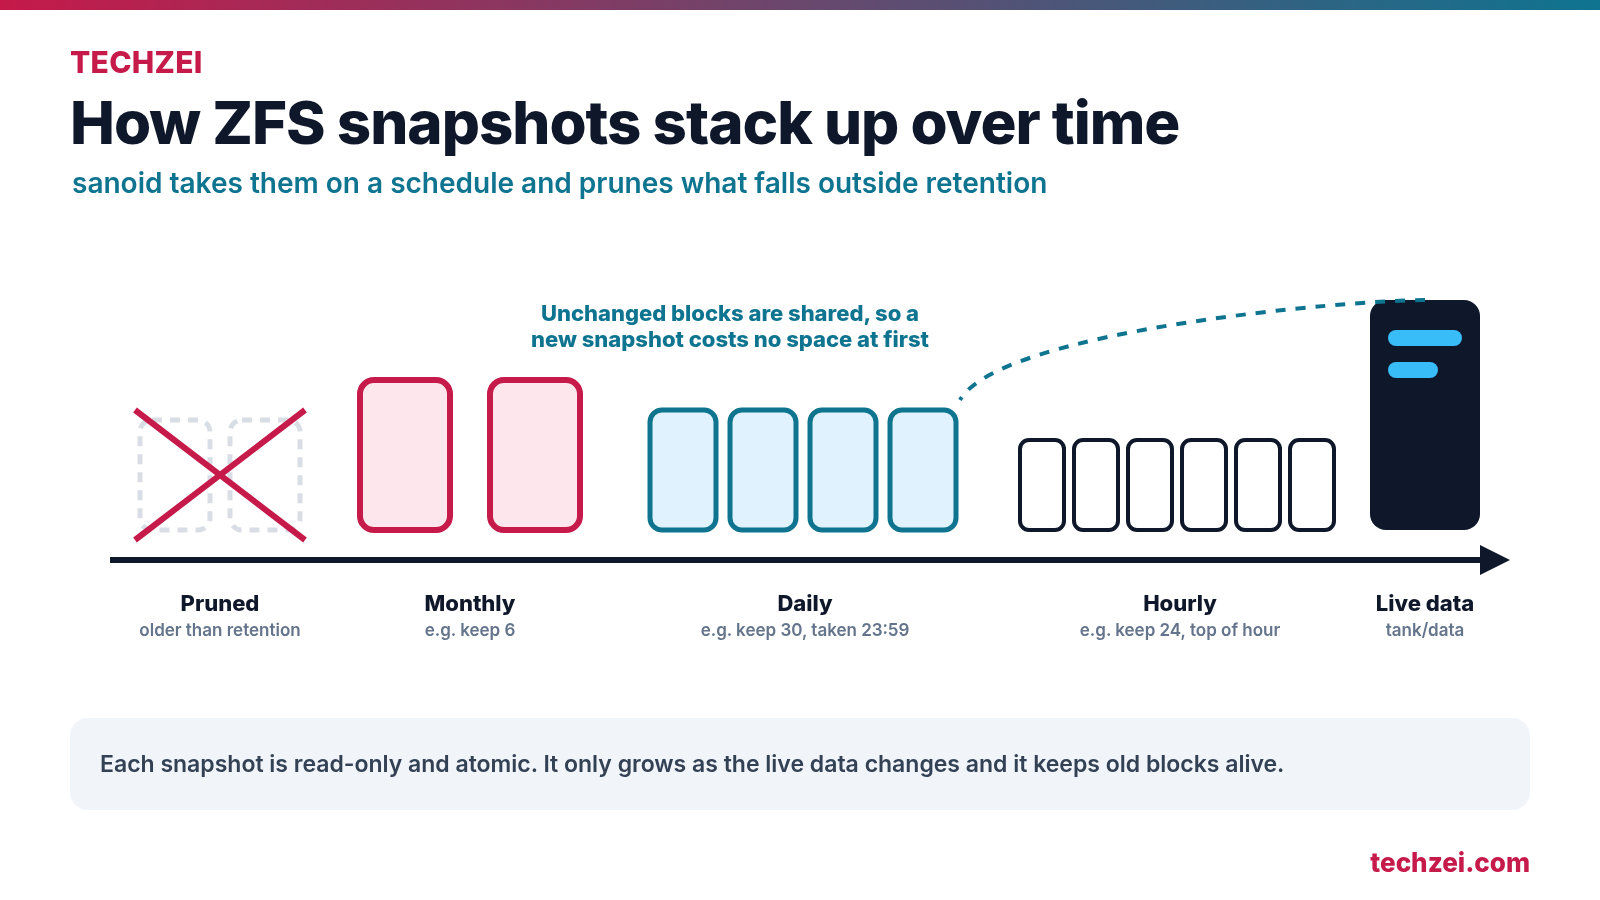
A ZFS snapshot is a read-only copy of a dataset at one moment. OpenZFS creates it atomically, so it contains every change that had completed before that instant and nothing after. Because ZFS is copy-on-write, a new snapshot takes no extra space at first. It only starts to consume space as the live data moves on and the snapshot keeps the old blocks alive.
That is why snapshots are cheap to take every hour but not free to keep forever. A dataset that changes a lot, such as a VM disk or a download folder, can make old snapshots grow quickly, while a photo archive barely grows at all. You can create one by hand at any time:
sudo zfs snapshot tank/data@before-upgrade
sudo zfs snapshot -r tank@before-upgrade   # tank and every child dataset
zfs list -t snapshot -o name,used,creation tank/data
Sanoid automates this: it takes snapshots on a policy, names them consistently (for example autosnap_2026-11-15_00:00:02_hourly), and deletes old ones once they fall outside your retention.
Before you start
- A Linux machine with an OpenZFS pool already created. The examples use a pool called
tankwith atank/datadataset, and a backup pool calledbackup. Runzfs listto see your own names. - Root or sudo access on every machine involved.
- Separate datasets for data with different value. Snapshots and retention are set per dataset, so
tank/photos,tank/vmandtank/downloadscan each get a different policy. A single giant dataset forces one policy on everything. - For replication, a second pool (another set of disks, even in the same box) or a second machine with ZFS, reachable over SSH.
If you run TrueNAS, you do not need sanoid at all. TrueNAS has its own Periodic Snapshot Tasks and Replication Tasks in the web interface, and the scrub section below still applies.
Step 1: Install sanoid on Debian, Ubuntu or Proxmox VE
Sanoid is packaged in Debian and in Ubuntu’s universe repository, and the single sanoid package contains sanoid, syncoid and findoid. Proxmox VE is built on Debian, so the same command works on a Proxmox host.
sudo apt update
sudo apt install sanoid
sanoid --version
Packaged versions trail the upstream project. Debian 13 “Trixie” ships 2.2.0, Ubuntu 24.04 LTS ships 2.2.0, and Ubuntu 26.04 LTS has 2.3.0, which is also the latest upstream release. Debian 12 and Ubuntu 22.04 carry 2.1.0. If you need a newer build, the project’s INSTALL guide explains how to build your own Debian package from the GitHub repository.
Syncoid works without extra tools, but it uses pv for progress bars, lzop for compression and mbuffer for buffering when they are present, so install them on both ends of any replication link:
sudo apt install pv lzop mbufferTwo details of the Debian package are worth knowing. The default settings live in /usr/share/sanoid/sanoid.defaults.conf, which you should never edit, and the sanoid service refuses to run until /etc/sanoid/sanoid.conf exists and is not empty. Installing the package therefore does nothing to your pool until you write a config.
Step 2: Write /etc/sanoid/sanoid.conf
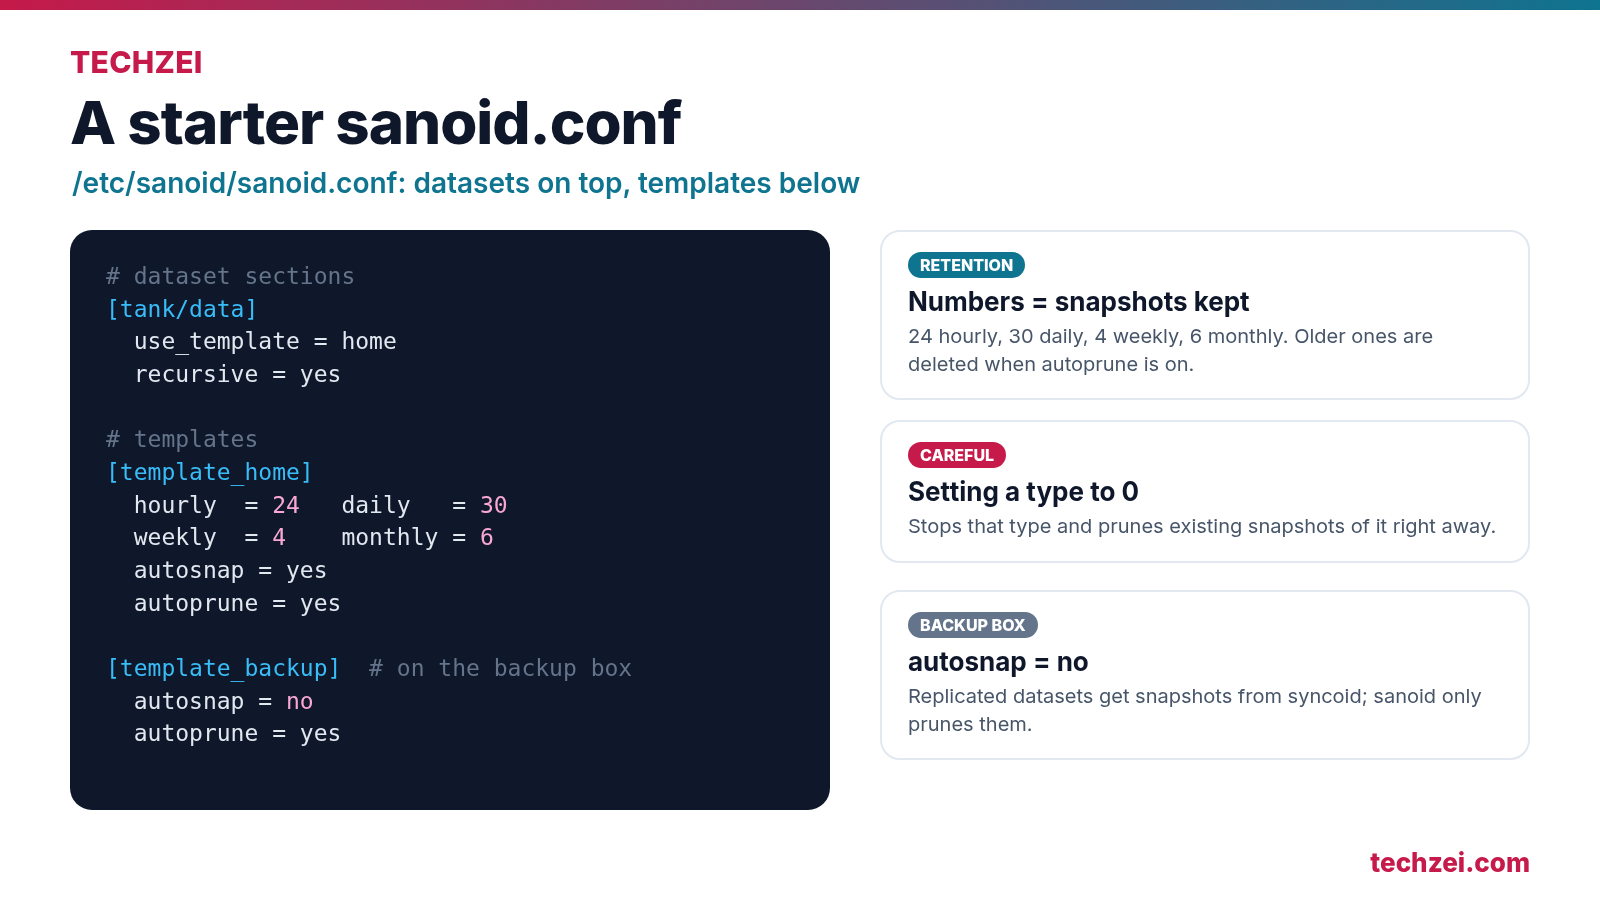
The config has two kinds of sections. Dataset sections, named after the dataset with no leading slash, say which template to use. Template sections, named template_something, hold the retention numbers. Here is a sensible starting point for a home server:
sudo mkdir -p /etc/sanoid
sudo nano /etc/sanoid/sanoid.conf
[tank/data]
use_template = home
recursive = yes
[tank/data/media]
# large files that rarely change: skip hourlies
hourly = 0
[tank/vm]
use_template = vms
recursive = zfs
#############################
# templates below this line #
#############################
[template_home]
frequently = 0
hourly = 24
daily = 30
weekly = 4
monthly = 6
yearly = 0
autosnap = yes
autoprune = yes
[template_vms]
frequently = 0
hourly = 12
daily = 14
weekly = 0
monthly = 2
yearly = 0
autosnap = yes
autoprune = yesEach number is how many snapshots of that type to keep. With the home template, you can step back to any of the last 24 hours, any of the last 30 days, the last four weeks and the last six months. Anything older is pruned automatically because autoprune is on.
A few settings trip people up:
- Setting a type to 0 stops sanoid taking that type and also prunes any existing snapshots of that type straight away. Changing
hourly = 0on a dataset that already has hourlies deletes them on the next run. recursive = yesapplies the policy to every child dataset, snapshotting them one at a time, and new children are picked up immediately. You can still override a child, astank/data/mediadoes above.recursive = zfsuseszfs snapshot -r, so the whole tree is captured at the same instant. That suits VM disks that belong together, but it does not make a running guest application-consistent. Children also cannot have their own overrides.process_children_only = yesmanages the children but leaves the parent dataset itself alone.- Anything you leave out comes from the defaults file, which keeps 48 hourlies, 90 dailies and 6 monthlies. If you only write
daily = 7, you still get 48 hourlies.
The table shows the default snapshot times. The Debian service runs sanoid with TZ=UTC, which the project recommends to avoid daylight saving problems, so those times are UTC, not local time.
| Setting | Defaults file | README “production” template | Sample “backup” template | What it controls |
|---|---|---|---|---|
| frequently | 0 | 0 | 0 | Sub-hourly snapshots, every 15 minutes by default (frequent_period) |
| hourly | 48 | 36 | 30 | Hourly snapshots kept |
| daily | 90 | 30 | 90 | Daily snapshots kept (taken at 23:59) |
| weekly | 0 | 4 | 4 | Weekly snapshots kept (Monday 23:30) |
| monthly | 6 | 3 | 12 | Monthly snapshots kept (00:00 on the 1st) |
| yearly | 0 | 0 | 0 | Yearly snapshots kept |
| autosnap | on | yes | no | Whether sanoid takes new snapshots here |
| autoprune | yes | yes | yes | Whether sanoid deletes expired snapshots |
Step 3: Turn on the sanoid timer and check your first snapshots
The Debian and Ubuntu package ships sanoid.timer, which runs every 15 minutes, plus a sanoid-prune.service that cleans up after each snapshot run. There is also a cron entry in /etc/cron.d/sanoid, but it only fires on systems that are not running systemd, so the two never overlap. Before enabling anything, do a dry run:
sudo sanoid --cron --readonly --verboseThe --readonly flag simulates the run without creating or deleting anything, which is the quickest way to catch a typo in a dataset name. When the output looks right, enable the timer and run it once by hand:
sudo systemctl enable --now sanoid.timer
sudo systemctl start sanoid.service
systemctl list-timers sanoid.timer
zfs list -t snapshot -o name,used,creation -s creation tank/data
You should see a set of autosnap_..._hourly, _daily, _weekly and _monthly snapshots straight away, because sanoid takes any type that is due and missing. After that, new ones appear on schedule and old ones vanish as they expire. If something looks wrong, journalctl -u sanoid.service -u sanoid-prune.service shows what each run did.
For monitoring, sanoid --monitor-snapshots warns when the newest snapshot of a type is overdue, and sanoid --monitor-health reports pool health, both in Nagios-style output.
Step 4: Replicate snapshots with syncoid
Syncoid needs no config file. You give it a source and a destination, and it works out what the target is missing, sends it with zfs send and zfs receive, and resumes interrupted transfers when both sides support it. The first run sends a full snapshot; later runs can send only changes. SSH protects the transfer, but you must configure encryption on the backup pool separately if you need the stored copy encrypted.
Replicate to a second local pool
sudo syncoid --recursive tank/data backup/tank-dataLet syncoid create the target dataset on the first run. If backup/tank-data already exists with unrelated data, syncoid stops rather than overwrite it.
Push or pull to another machine
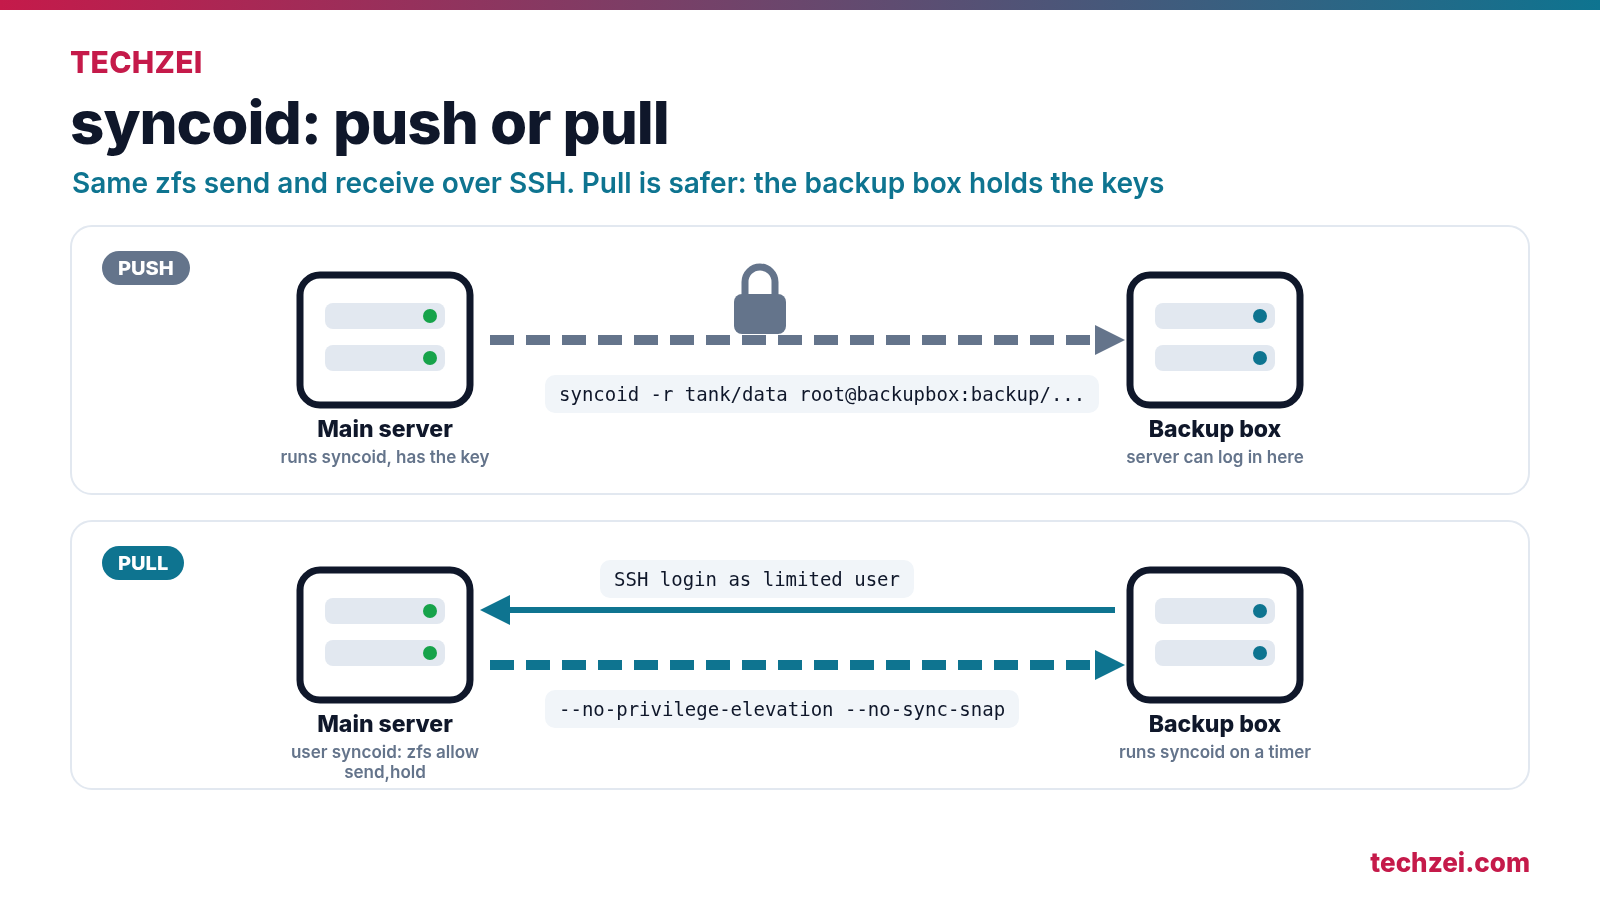
Over SSH, the remote side is written as user@host:dataset. Which side runs syncoid decides the direction:
# push: run on the main server, send to the backup box
sudo syncoid --recursive tank/data root@backupbox:backup/server/tank-data

# pull: run on the backup box, fetch from the main server
sudo syncoid --recursive root@server:tank/data backup/server/tank-data
A pull can limit the damage from a compromised main server: the backup box holds the SSH key, and the main server does not need a login on the backup box. That does not replace access controls or an offline copy. Push is simpler when you only have an account on the target.
Run syncoid without root using zfs allow
Logging in as root over SSH works, but a dedicated user with only the ZFS permissions it needs is safer. OpenZFS calls this delegation, and syncoid’s --no-privilege-elevation flag tells it to skip its root check and trust those delegated permissions instead of trying sudo. Create a syncoid user on both machines, then on the server (the source):
sudo zfs allow -u syncoid send,hold tank/data
zfs allow tank/data
On the backup box (the target), grant the right to create and receive datasets under a parent you create first:
sudo zfs create -o mountpoint=none backup/server
sudo zfs allow -u syncoid create,mount,receive,rollback,destroy backup/server
There is a Linux wrinkle here. OpenZFS cannot delegate mounting on Linux, because only root may change the system’s mount table, so a non-root user can receive a dataset but not mount it. Pass --recvoptions="u" so received datasets are left unmounted instead of producing errors. The mount permission is still granted because OpenZFS requires it alongside create, receive, rollback and destroy.
Next, give the backup box’s syncoid user an SSH key that can log in to the server, then run the first pull as that user:
sudo -u syncoid ssh-keygen -t ed25519
sudo -u syncoid ssh-copy-id syncoid@server

sudo -u syncoid /usr/sbin/syncoid --recursive --no-privilege-elevation \
  --no-sync-snap --recvoptions="u" \
  syncoid@server:tank/data backup/server/tank-data
--no-sync-snap matters with this setup. Normally syncoid creates its own temporary syncoid_... snapshot on the source at the start of each run, which would need snapshot and destroy rights there. With the flag, it only replicates the snapshots sanoid already made, so the source user needs nothing beyond send and hold. The trade-off is that the backup is only as fresh as the newest sanoid snapshot.
Schedule the pull and prune the backup copies
A small systemd service and timer on the backup box runs the pull every hour:
# /etc/systemd/system/syncoid-pull.service
[Unit]
Description=Pull ZFS snapshots from server with syncoid
Wants=network-online.target
After=network-online.target

[Service]
Type=oneshot
User=syncoid
ExecStart=/usr/sbin/syncoid --recursive --no-privilege-elevation --no-sync-snap --recvoptions="u" syncoid@server:tank/data backup/server/tank-data

# /etc/systemd/system/syncoid-pull.timer
[Unit]
Description=Hourly syncoid pull

[Timer]
OnCalendar=*:15
Persistent=true

[Install]
WantedBy=timers.target
sudo systemctl daemon-reload
sudo systemctl enable --now syncoid-pull.timerReplicated snapshots pile up on the target unless something prunes them. Install sanoid on the backup box too, and point it at the replicated datasets with a template that never takes its own snapshots. The project’s sample config calls this a backup template:
[backup/server]
	use_template = backup
	recursive = yes

[template_backup]
	autoprune = yes
	autosnap = no
	frequently = 0
	hourly = 30
	daily = 90
	weekly = 4
	monthly = 12
	yearly = 0
This also lets the backup keep more history than the server does. Keeping 12 monthlies on the backup box while the server keeps six is a cheap way to cover a mistake you only notice months later.
What a ZFS scrub actually checks
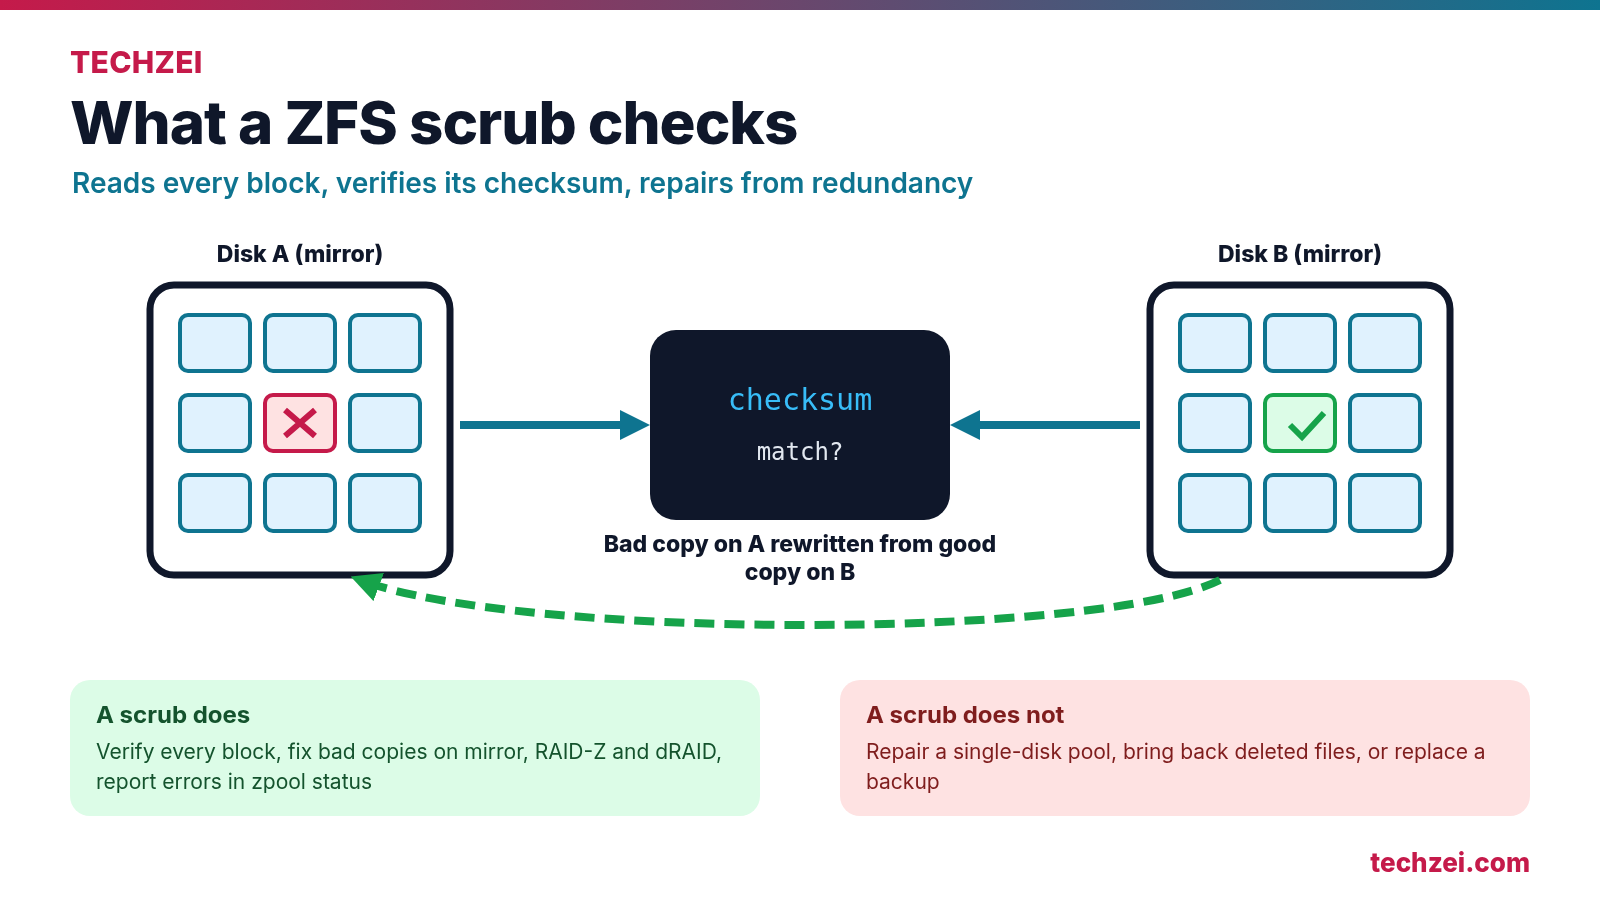
Every block ZFS writes carries a checksum. Normal reads verify it, but data you never read, such as old photos or last year’s VM images, could quietly rot on a failing disk for months. A scrub reads all data in the pool and verifies every block’s checksum. On mirror, RAID-Z and dRAID pools, ZFS automatically repairs any damage it finds by rewriting the bad copy from a good one.
OpenZFS calls these checksum errors silent data corruption: the disk returned data it believed was correct, but it was not. Without a scrub, you find out only when you next open the file, possibly after the second disk has also failed.
What a scrub cannot do is just as important:
- It cannot reconstruct a damaged file block on a single-disk pool without another good copy. ZFS may keep extra copies of some metadata, but a scrub is no substitute for data redundancy or a separate backup.
- It is not a backup. A scrub keeps your existing data honest. It does nothing about a file you deleted, ransomware, a controller that destroys the pool, or a house fire. That still needs snapshots plus a copy elsewhere, ideally off-site, which is the logic behind a 3-2-1 restic backup.
- It is not a resilver. A resilver only rebuilds data ZFS knows is out of date, for example after you replace a disk. A scrub examines everything to find errors nobody knew about. ZFS runs one of them at a time, and a scrub will not start while a resilver is running.
A scrub is heavy on disk I/O, so it is normally scheduled for a quiet night. You can run one by hand, watch it, and pause or stop it if it gets in the way:
sudo zpool scrub tank       # start, or resume a paused scrub
zpool status tank           # progress and estimated time
sudo zpool scrub -p tank    # pause; progress is saved
sudo zpool scrub -s tank    # stop completely
A paused scrub stays paused across reboots until you run zpool scrub again, which picks it up from its last checkpoint.
Step 5: Schedule scrubs on Debian, Ubuntu, Proxmox VE and TrueNAS
Before adding your own schedule, check what the system already does. Doubling up wastes a night of disk I/O each month.
Debian, Ubuntu and Proxmox VE
The zfsutils-linux package on all three installs /etc/cron.d/zfsutils-linux, which scrubs every healthy pool at 00:24 on the second Sunday of each month and runs TRIM on the first Sunday. Proxmox’s own ZFS packaging ships the same file, so a Proxmox host on ZFS is already being scrubbed monthly. The script skips pools that are not ONLINE or already scrubbing.
cat /etc/cron.d/zfsutils-linux
zfs get org.debian:periodic-scrub tank
To opt a pool out of that cron job, set the Debian property on its root dataset to disable. That is useful if you prefer the systemd timers OpenZFS ships, which run monthly or weekly per pool with a randomised delay of up to an hour:
sudo zfs set org.debian:periodic-scrub=disable tank
sudo systemctl enable --now zfs-scrub-monthly@tank.timer
systemctl list-timers 'zfs-scrub*'
For most home servers the existing monthly cron job is fine; the main reason to change it is to move the scrub away from a time when the disks are busy.
TrueNAS
TrueNAS creates a scheduled scrub for each new pool, set to run every Sunday at 12:00 AM, with a threshold of 35 days. The task checks every Sunday, but only actually scrubs once 35 days have passed since the last completed scrub, so in practice it is roughly every five weeks. The Storage Health widget shows the schedule, and its Configure link lets you change the schedule and threshold days. TrueNAS suggests using a multiple of seven so the scrub always lands on the same weekday.
Step 6: Read zpool status
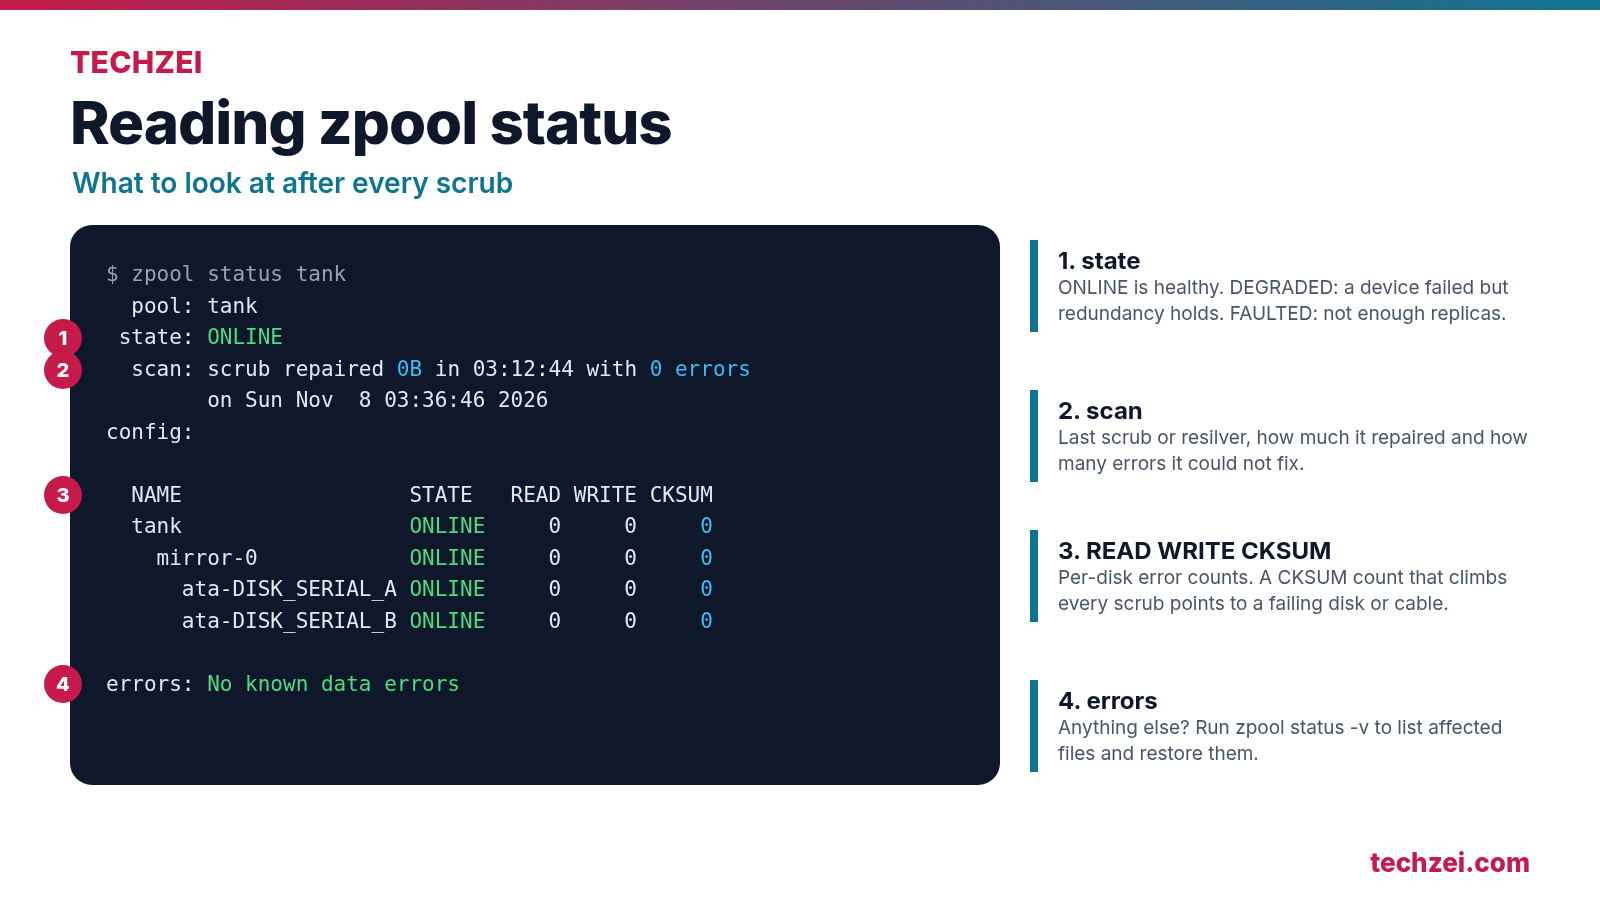
After a scrub, zpool status tells you whether anything was found. A healthy two-disk mirror looks like this:
  pool: tank
 state: ONLINE
  scan: scrub repaired 0B in 03:12:44 with 0 errors on Sun Nov  8 03:36:46 2026
config:

        NAME                     STATE     READ WRITE CKSUM
        tank                     ONLINE       0     0     0
          mirror-0               ONLINE       0     0     0
            ata-DISK_SERIAL_A    ONLINE       0     0     0
            ata-DISK_SERIAL_B    ONLINE       0     0     0

errors: No known data errors- state is ONLINE when every device works normally. DEGRADED means a device has failed or is misbehaving but redundancy is still keeping data available. FAULTED means the pool lacks the replicas to keep working.
- scan shows the last scrub or resilver, how much it repaired and how many errors it could not fix. Repaired data with 0 errors means ZFS found bad copies and fixed them.
- READ, WRITE and CKSUM count errors per device. READ and WRITE are I/O errors; CKSUM counts blocks that came back wrong. A one-off count after a loose cable may never return, while a number that climbs scrub after scrub points to a failing disk or cable.
- errors should say
No known data errors. If not,zpool status -vcan identify affected files. Restore them from an independent backup, or from an earlier snapshot only if that snapshot still contains a readable version.
Once you have fixed the cause, such as a reseated cable, clear the counters with sudo zpool clear tank so new errors stand out. For a quick daily check across all pools, zpool status -x prints only pools with problems, or a short all-clear when there are none.
Step 7: Restore a file from .zfs/snapshot or roll back
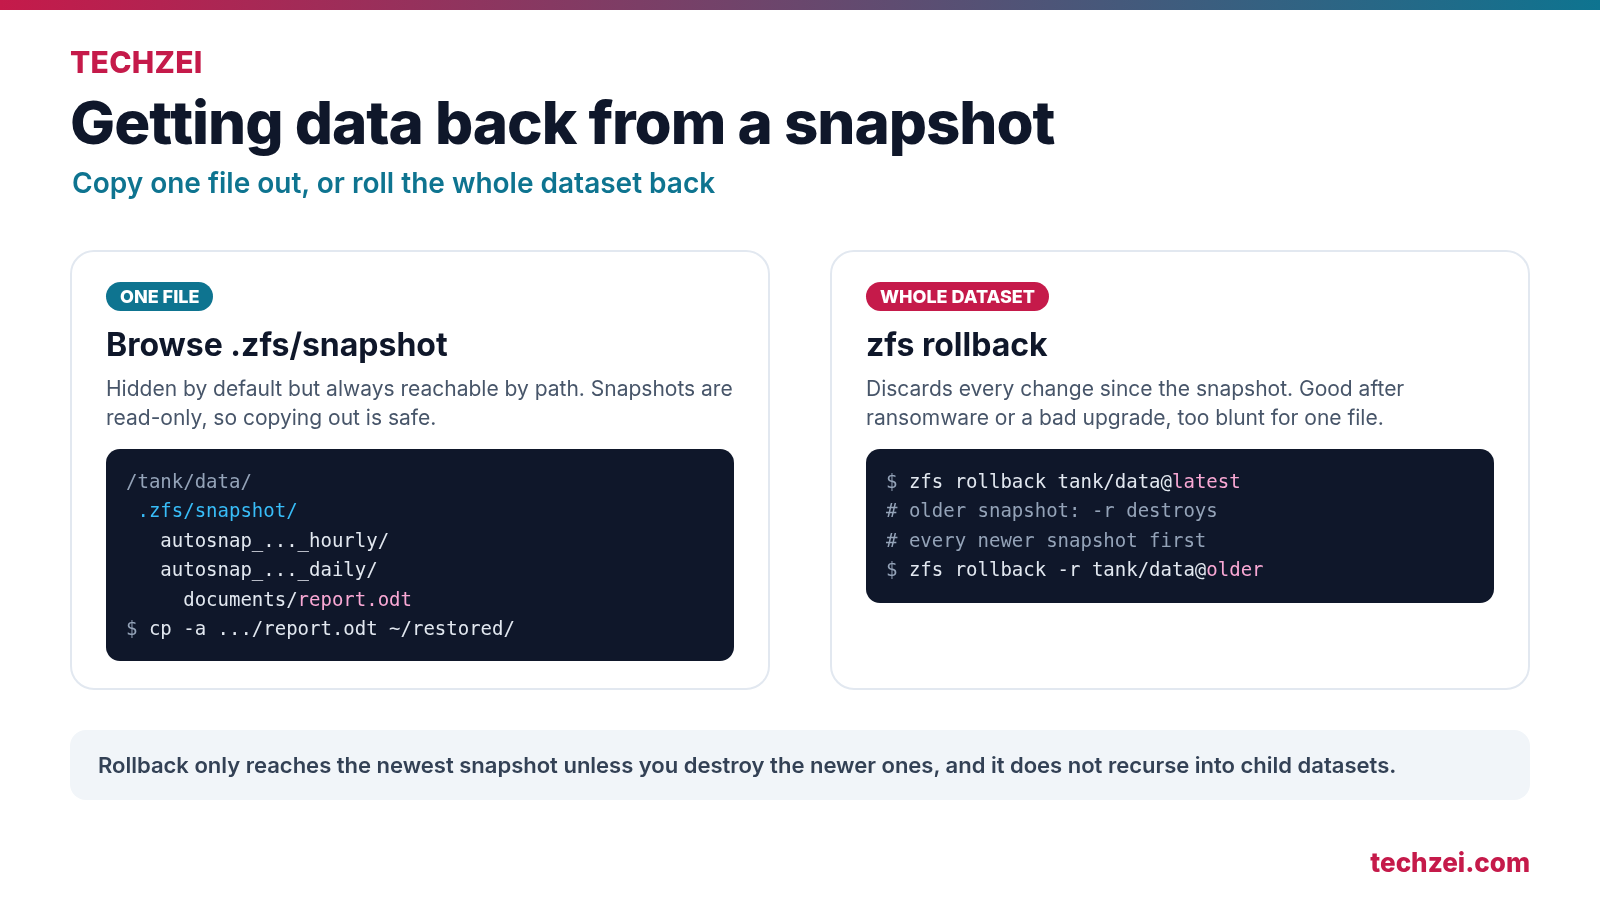
Every snapshot of a filesystem is reachable under a hidden .zfs/snapshot directory at the root of that dataset, mounted on demand when you open it. It does not show up in ls -a by default because the snapdir property defaults to hidden, but you can type the path directly. To get one file back, copy it out:
ls /tank/data/.zfs/snapshot/
ls /tank/data/.zfs/snapshot/autosnap_2026-11-14_23:59:01_daily/documents/
cp -a /tank/data/.zfs/snapshot/autosnap_2026-11-14_23:59:01_daily/documents/report.odt \
  /tank/data/documents/report-restored.odt
Snapshots are read-only, so nothing you do in that folder can damage them. If you want the folder visible to SMB or NFS users so they can restore their own files, set sudo zfs set snapdir=visible tank/data.
Rolling back is the bigger hammer. It throws away every change since the chosen snapshot and returns the whole dataset to that moment, which is what you want after ransomware or a botched upgrade, and what you do not want for one lost file:
sudo zfs rollback tank/data@autosnap_2026-11-15_06:00:01_hourly
sudo zfs rollback -r tank/data@autosnap_2026-11-14_23:59:01_daily
By default, ZFS only rolls back to the most recent snapshot. To go further back, -r destroys every newer snapshot, including sanoid’s hourlies from after that point, so be certain before you run it. Rollback also does not recurse into child datasets; each one is rolled back separately. On the backup box, root can give a replicated dataset a mountpoint and use the same .zfs/snapshot trick, so you can restore files even if the main server is dead.
ZFS snapshot and scrub troubleshooting
| Problem | Likely cause | Fix |
|---|---|---|
| No snapshots appear after enabling sanoid | sanoid.conf missing or empty, or a dataset name typo | Run sudo sanoid –cron –readonly –verbose and check the dataset names against zfs list |
| Snapshots appear but old ones are never deleted | autoprune off in the template, or sanoid-prune.service not running | Set autoprune = yes and check journalctl -u sanoid-prune.service |
| All hourly snapshots vanished at once | hourly = 0 set on the dataset or inherited from a template | Setting a type to 0 prunes existing snapshots of that type; set a positive number |
| Snapshot times look hours off | The sanoid service runs in UTC | Expected behaviour; read snapshot names as UTC |
| Pool fills up even though files were deleted | Old snapshots still hold the deleted blocks | Check zfs list -t snapshot -o name,used and lower retention on busy datasets |
| syncoid refuses to sync to an existing target | Target dataset was created by hand, or no snapshot is shared with the source any more | Replicate to a new dataset name, or read about –force-delete before using it |
| syncoid as a normal user fails with permission denied | Missing zfs allow permissions or no –no-privilege-elevation | Check zfs allow on both sides and add the flag |
| Received datasets fail to mount on the target | Linux does not let non-root users mount | Add –recvoptions=”u” and mount as root only when you need to restore |
| Scrub will not start | A resilver is running, or the scrub is paused | Wait for the resilver; run zpool scrub again to resume a paused scrub |
| CKSUM errors on one disk after every scrub | Failing disk, cable or controller port | Check SMART data, reseat or swap the cable, replace the disk if counts keep rising |
| Scrub on a single-disk pool reports unrecoverable errors | No redundancy to repair from | Restore affected files from an independent backup; an older snapshot helps only if its copy is still readable |
My take
Start with an independent backup of anything you cannot replace. Then add sanoid with a retention policy that fits the data: hourly and daily snapshots make accidental deletion easier to undo, while a separate copy protects you if the pool fails. Check whether your system already schedules scrubs, and read zpool status after one completes.
Replication is where most home setups stay half-finished. A second pool in the same case protects you from a dead pool, not from a power surge or theft. A pull from a small ZFS box at a relative’s place, or an encrypted restic copy to cloud storage, is what actually completes the picture.
ZFS snapshots and sanoid FAQ
Are ZFS snapshots a backup?
Not on their own. They live in the same pool as your data, so they protect against deleted files and bad changes but disappear with the pool. Replicating them to another pool or machine with syncoid makes them a backup.
How often should I scrub a ZFS pool?
Monthly is the common default: Debian, Ubuntu and Proxmox VE scrub on the second Sunday of each month, and TrueNAS checks weekly but scrubs only after 35 days. Large pools on older disks can justify a shorter interval, as long as the scrub finishes well before the next one starts.
Can sanoid and syncoid run on TrueNAS or Proxmox VE?
On Proxmox VE, yes: install the sanoid package from the Debian repository like on any Debian system. On TrueNAS, use the built-in Periodic Snapshot Tasks and Replication Tasks instead of installing extra software on the appliance.
What is the difference between syncoid push and pull?
With push, the main server runs syncoid and sends snapshots to the backup machine. With pull, the backup machine runs syncoid and fetches them. Pull keeps the credentials on the backup box, so a compromised main server cannot delete the backups.
- SourceOpenZFS: zpool-scrub(8)
- SourceOpenZFS: zfs-allow(8)