


Welcome to the amazing world of Arduino! Started by students at the Design Institute of Ivrea, Italy, in 2005, Arduino has sparked innovation across all ages. From the sheer fun of making an LED blink once per second to running a fully working 3D printer to powering a small satellite, what you can do with one of these devices is only limited to your imagination and skill in programming.
Arduino’s are based on “Micro Controllers”, meaning they have a small IC (Integrated Circuit) chip that houses program memory, processor core, and programmable I/O peripherals. Depending on the model you decide to buy, you will be able to work with either an 8-bit Atmel AVR microcontroller or a fancy 32-bit Atmel ARM! In mid-2011, it was estimated that over 300,000 Arduino boards were let into the wild.
Today, I intend to give you a through understanding of the basics of Arduino. I will walk you through the different devices available, the differences in each, recommended places to buy starter gear, code examples, and much more.
What Can I Do With ‘Arduino’ ?
Arduino can be used to just make an LED blink, build a complex home automation system or use the various shields to make anything you want to. In general, It can help you solve problems
You can also buy a large range of products from sites such as eBay that will expand the possibilities even further.
- Distance measurement
- Humidity measurement
- Water-collision measurement
- Decibel measurement
- LED Matrixes
- Carbon Monoxide/Gas measurement
- LED displays
- Touchscreen LCD’s
When starting your Arduino journey, you will need to choose a board to work with. They come in various sizes and shapes, and it is up to you to choose the board most compliant with the tasks you wish to perform. They vary by size, memory, power, and I/O pins. Here, I will attempt to explain to you the differences in the various models available and hopefully give you a good view of what to buy.
We will start off with the three most popular boards available from Arduino.
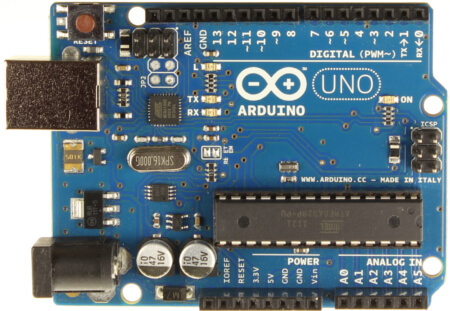
Arduino Uno
Arduino UNO is the most widely used Arduino Board. It is a pretty good board if you are getting started with Arduino life.It has 14 digital input/output pins (of which 6 can be used as PWM outputs), 6 analog inputs, a 16 MHz ceramic resonator, a USB connection, a power jack, an ICSP header, and a reset button. It has everything needed to support the micro controller; simply connect it to a computer with a USB cable or power it with a AC-to-DC adapter or battery to get started.Most small scaled DIY projects can be done with the Arduino UNO. If you need more Input Output and Analog pins I you will have to move on to the other Arduino Boards.
Summary
| Microcontroller | ATmega328 |
| Operating Voltage | 5V |
| Input Voltage (recommended) | 7-12V |
| Input Voltage (limits) | 6-20V |
| Digital I/O Pins | 14 (of which 6 provide PWM output) |
| Analog Input Pins | 6 |
| DC Current per I/O Pin | 40 mA |
| DC Current for 3.3V Pin | 50 mA |
| Flash Memory | 32 KB (ATmega328) of which 0.5 KB used by bootloader |
| SRAM | 2 KB (ATmega328) |
| EEPROM | 1 KB (ATmega328) |
| Clock Speed | 16 MHz |
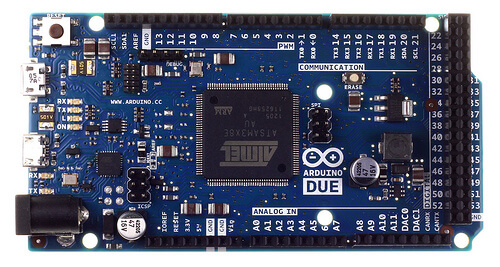
Arduino Due
The Arduino Due is a microcontroller board based on the Atmel SAM3X8E ARM Cortex-M3 CPU (datasheet). It is the first Arduino board based on a 32-bit ARM core microcontroller. It has 54 digital input/output pins (of which 12 can be used as PWM outputs), 12 analog inputs, 4 UARTs (hardware serial ports), a 84 MHz clock, a USB OTG capable connection, 2 DAC (digital to analog), 2 TWI, power jack, an SPI header, JTAG header, a reset button and an erase button. Unlike other Arduino boards, the Arduino Due board runs at 3.3V. The maximum voltage that the I/O pins can tolerate is 3.3V. Providing higher voltages, like 5V to an I/O pin could damage the board.
Summary
| Microcontroller | AT91SAM3X8E | |
| Operating Voltage | 3.3V | |
| Input Voltage (recommended) | 7-12V | |
| Input Voltage (limits) | 6-16V | |
| Digital I/O Pins | 54 (of which 12 provide PWM output) | |
| Analog Input Pins | 12 | |
| Analog Outputs Pins | 2 (DAC) | |
| Total DC Output Current on all I/O lines | 130 mA | |
| DC Current for 3.3V Pin | 800 mA | |
| DC Current for 5V Pin | 800 mA | |
| Flash Memory | 512 KB all available for the user applications | |
| SRAM | 96 KB (two banks: 64KB and 32KB) | |
| Clock Speed | 84 MHz |
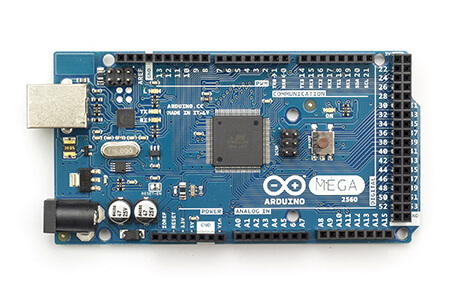
Arduino Mega 2560
Based on the ATmega2560 chip, this powerhouse has a blazing 16MHz clock speed! Additionally, it features 54 digital I/O pins (15 of them are PWM capable), 16 analog inputs, and finally 4 UARTs This is the beast of the Arduino family, intended for projects such as satellites or 3D printers, where processing power and I/O pins are a must.
 Summary
| Microcontroller | ATmega2560 |
| Operating Voltage | 5V |
| Input Voltage (recommended) | 7-12V |
| Input Voltage (limits) | 6-20V |
| Digital I/O Pins | 54 (of which 15 provide PWM output) |
| Analog Input Pins | 16 |
| DC Current per I/O Pin | 40 mA |
| DC Current for 3.3V Pin | 50 mA |
| Flash Memory | 256 KB of which 8 KB used by bootloader |
| SRAM | 8 KB |
| EEPROM | 4 KB |
| Clock Speed | 16 MHz |
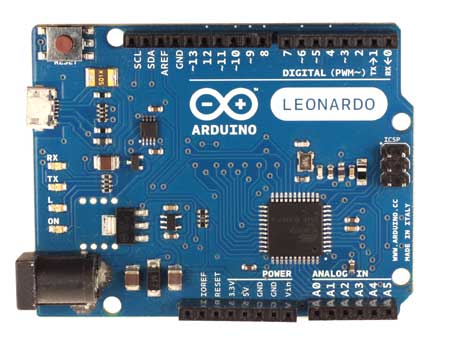
Arduino Leonardo
The Leonardo differs from all preceding boards in that the ATmega32u4 has built-in USB communication, eliminating the need for a secondary processor. This allows the Leonardo to appear to a connected computer as a mouse and keyboard, in addition to a virtual (CDC) serial / COM port. It also has other implications for the behavior of the board
Summary
| Microcontroller | ATmega32u4 |
| Operating Voltage | 5V |
| Input Voltage (recommended) | 7-12V |
| Input Voltage (limits) | 6-20V |
| Digital I/O Pins | 20 |
| PWM Channels | 7 |
| Analog Input Channels | 12 |
| DC Current per I/O Pin | 40 mA |
| DC Current for 3.3V Pin | 50 mA |
| Flash Memory | 32 KB (ATmega32u4) of which 4 KB used by bootloader |
| SRAM | 2.5 KB (ATmega32u4) |
| EEPROM | 1 KB (ATmega32u4) |
| Clock Speed | 16 MHz |
These are the most widely used boards there are also other boards you can check them out in the official Arduino website www.arduino.cc.
If you are just beginner I’d suggest you to pick up Arduino UNO as there are a lot of resources that help you get started quicker. In the upcoming days we’ll be learning about shield, how to install the Arduino IDE, Getting started with the blink program and much more complicated Arduino Projects!


3 thoughts on “Getting Started with Arduino”