Learn how to build a FM Radio Transmitter using a Raspberry Pi. This little hack doesn’t need anything much other than the Raspberry Pi and a Jumper cable. It allows you to transmit any audio content through the Raspberry Pi. Building this Raspberry Pi Radio Transmitter wouldn’t take more than 15-20 minutes to set up and start transmitting.
Hardware Required
- Raspberry Pi.
- SD Card.
- Jumper Cable
- Mobile Phone or FM Radio
Wiring
Connect a jumper cable to header 7 of the Raspberry Pi, the jumper cable acts as the transmitter for Radio. 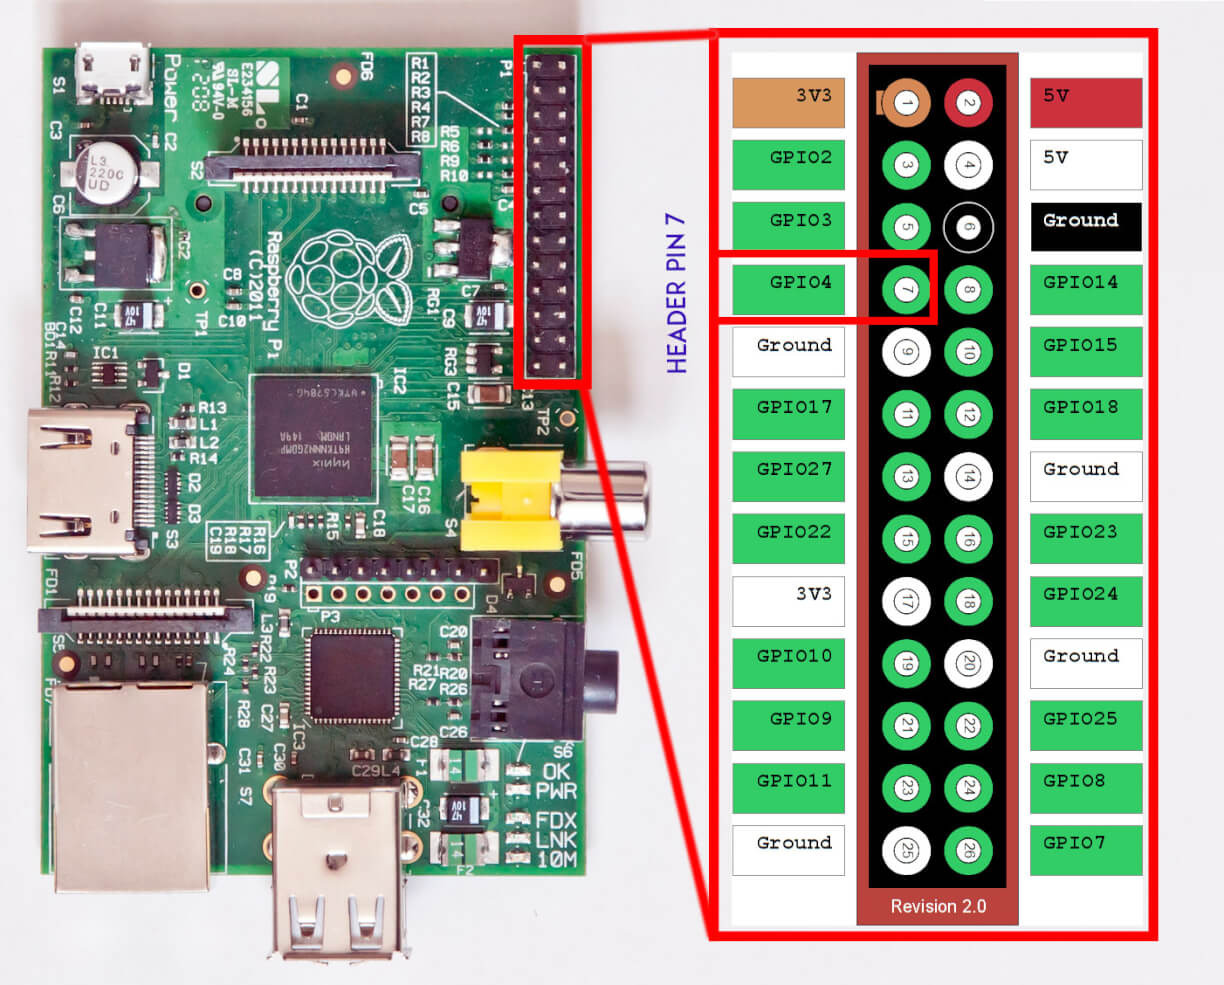
Procedure
Step 1 : Connect to your Raspberry Pi through ssh or open the Terminal in your Raspberry Pi Step 2 : Type this into the terminal
wget http://www.omattos.com/pifm.tar.gz
This will download the python script that helps with the transmission Step 3 : Untar the file you downloaded. Type this into the terminal
tar xvzf pifm.tar.gz
Step 4 : Now change directory to the pifm folder
cd pifm
Step 5 : Open your Radio App on your phone or if you still have a functioning radio tune to 100Mhz and then in your terminal type
sudo ./pifm sound.wav 100.0
If everything went well you should now be hearing Star Wars sound track in your radio. In the next post we will learn how to make a playlist for the Raspberry Pi Radio Transmitter. Although if you’re feeling like exploring check out the PirateRadio project which enables playback without using command line.
Note : The Raspberry Pi radio transmitter can be built without the jumper cable, the trade-off is that the range drops to ~10 cm from 100 meters.It is not allowed to broadcast on these frequencies in some countries. Make sure you read about your local laws before trying this hack.








Do you mean that jumper cable connected to header 7 will be some sort of antenna? any cable okey? length or terminal type etc.
The jumper cable connected to header 7 will act as an antenna. Any cable should be okay.
Thank you so much John 🙂 I will try it.
What’s the recommended distro?
I’d personally recommend Raspbian other distros also should be fine.
One that runs python ? 😉
I’m getting a constant humming noise instead of the sound when I run this? I’ve read a couple other forum posts with people having the same problem? Any idea what might be causing this?
Try to change the antenna/jumper cable. It helps.
I have a GPS radio antenna that is not being used for anything. Would hooking that up increase the range at all or would I need a powered solution?
It depends on the antenna. Try to use an old radios antenna.
A summary of how it works would be nice without having to go through the source code. For example I would have thought that 100MHz is a big ask even for an RPi. What techniques are used to accurately modify the frequency of the 100MHz signal? Haw does the .wav file modify the signal?
does this transmit mp3 also or just wav files?
Use PiFMPlay for mp3.
Hi
This is great. What are the frequency limits? Is it AM or FM transmitter?
This is a FM Transmitter.
100 MHz is not 100 meters. Unless I am misunderstanding something.
Also, what is the power output of this transmitter? Thanks.
100MHz is not 100 meters it is the frequency it transmits on. The range varies depending on the antenna. If you are using a jumper cable it will cover around 10-20 meters.
should we connect jumper cable to header pin 7 only or can we connect it to any other pin
Connect to the header pin 7 only.
Do you have the code folder? The original page is down.. pls upload or Mail it 🙂
It’s working right now.
Wow, worked in 2 minutes!!! What a great idea! Thanks
The command is unknown for my Raspberry Pi, I have an RPi 2 and this might be for RPi 3, what would the code be for my version?Note, I’m only having this problem for the very last step.
This was intended for RPi 1.
will this work with a pi 3?